|
|
 |
| Search |
|
||||||||||
|
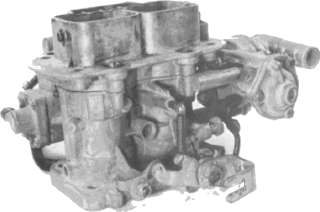
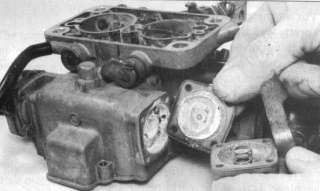
Most Locust owners use the Ford 1300 / 1600 Crossflow engine, with a few exceptions, it is still one of the easiest engine to "tune up". Weber's are without doubt, the most popular carburettors with most people who use the Crossflow. They give better performance and economy than the standard Ford carb, and though they might look complicated, they are much easier to overhaul and set up than other carbs. So after removing my 1300 unit last year and replacing it with a 1600 engine, it's was time to look for a decent carburettor, without spending too much money. The Weber DCOE 40s or 45s new, are over £ 500 and that's not including the manifold and linkages, plus fitted with Air filters they would involve cutting a large section out of the bonnet as they poke out the side. Also good secondhand one's are as rare as rocking horse poo. In comes the good old DGV / DGAV carb as an alternative. It's a good carburettor for the engine for fast roadwork and there are still plenty of them to be found in car breakers yards. The carb comes in two varities. The DGV uses a manual choke and the DGAV has an automatic choke. If you buy the DGAV and you don't like the thought of extra pipe work to the automatic choke you can quite easily fit a manual choke conversion. The carb can be found on the 1600 Mk 2 Escorts Sports and in very large numbers on the 1600 and 2Ltr Cortinas and Capri's. You will of cause need a manifold, which you can buy from specialist tuning firms or Weber themselves. You can also find them on the Mk 1 or Mk 2 Escort GT models, Mk 1 or Mk 2 1600 GT Capri and Mk 2 1600 Cortina GT models. Things to look out for if buying from a breakers is wear at the throttle spindle e.g. the primary throttle, also check it over thoughly if it has been standing out in all weathers. Apart from that a good clean and overhaul will be in order. First job will be to clean off all the old oil and muck. Just put the complete carb in a bath of White Spirit and leave it for a couple of days and then use an old toothbrush ( or you partners new one ) and scrub away. While the carb is soaking, you can order up a overhaul kit from Weber or one of their agents. There have been a lot of DGA/DGAV model's over the years, so when ordering parts you will need the ID No. from the main flange of the carb. Start dismantling the carb by removing the small "C" clip on the top choke link. Undo the 6 screws holding the top on. Lift off carefully, as it contains the two float's. You can now see the various jets which can be removed. Keep them all in order. There are a total of NINE jets which can be removed at this stage.
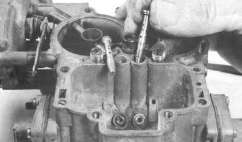
Two main correction jets in the top face of the lower body can be removed. They will have a brass emulsion tube under them and they sometimes get stuck. Use a small piece of wood to extract them so as to not damage them. Don't use wire or you could damage the parts.. Next to the correction jets is the accelerator pump jet, which is "Y" shaped. It has either one or two holes in each end.
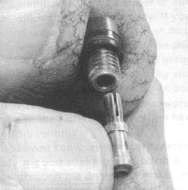
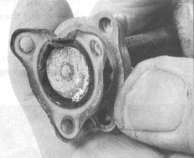
There are two mains jets set at an angle in the bottom of the float bowl. The large brass jet in the bottom of the bowl is the full power needle valve, and the needle must be free. On the top of the body is a brass-blanking plug for the accelerator pump. There are two large brass screws, one on either side of the carb body. These are the Primary and secondary idle jets. When you remove these, they are in two pieces. A jet and holder.
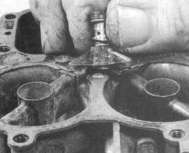
The last jet is the idle mixture brass screw at the bottom of the carb body. Once you have removed all these jets, give all a good soak in the cleaner again, and blow through all holes to make sure they are free. Fit new accelerator pump diaphragm. Weber carburettors have lead plugs in them but they do not recommend that you remove them. They are fitted with a special tool and fit not fitted properly will lead to fuel and air leaks. One last thing is the power valve on the top park of the carb. It is held with three screws with a tall spring sticking out. Take this off carefully as you don't get a new diaphragm in the kit.
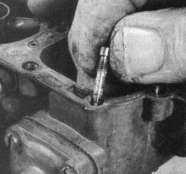
To check to make sure the diaphragm works, block the bleed hole with your finger, at the same time pushing the diaphragm down. If it stays down until you release your finger off the bleed hole, it is OK.
I converted my carburettor to manual choke using a kit and assembled the carb using the relevant gaskets.Screw back all jets, screw the idle mixture screw "home" then undo three full turns. This should give you a basic setting to get the engine started and it may run OK Do not run the engine if the mixture is not in the right ball park both over lean and and overich mixures can damage your engine. The carburettor will need to be calibrated to your engine. The best method avoiding a lot of trial and error is by using a Rolling Road and this should be the next stop. Jets only cost about £ 2.00 and the Rolling road tune is about £ 70.00. Well worth it. Last tip, don't go for full power readings on a newly rebuilt engine. Wait until things have bedded down, then go on the Rolling road again. My Weber came from a breakers, cost £ 20.00 with the manifold. The gaskets set was, £ 15.90 and the Rolling road was £ 65.00, and BOY did the car go afterwards. CHRIS LAYCOCK |
||||||||||
|
|
||